So what if you needed to find out information about your computer that is otherwise available in third party programs or all over Windows? You can use WMIC to find out a lot of information about your computer. I’ve been using some of these for years but only remembered to blog about it after I saw a post at What’s On My PC (Thanks Rick!) back in 2011.
Here’s a quick list from Microsoft (Use WMIC the alias command)
Examples:
Here’s how to get your hard drive information –
Go to a command prompt and type:
wmic diskdrive get name,size,model
So how many partitions does it have?
wmic partition get name, size, type
This shows one hard drive and three partitions. (above)
How about BIOS information?
wmic bios get name,serialnumber,version
What service packs, patches and hotfixes were installed and on what date?
wmic qfe get description,installedOn /format:csv
Want to know more information about WMI? Click here to see how WMI is used at over at Microsoft
You can of course use the Windows GUI to check your SSD or HDD. But did you know that you should check your drives by typing the following (you can copy and paste in a elevated command prompt and change switches as necessary)-
With the Nagle-Algorithm, Windows takes small packets and packages them in to more manageable and efficient sizes. If you have poor latency, you might try to disable the Nagle-Algorithm. Nagle’s algorithm helps to control congestion when small packets are sent continuously by TCP. When enabled, this helps to prevent a flood of these packets.
Open regedit.exe. Navigate to HKey_Local_Machine\System\CurrentControlSet\Services\Tcpip\Parameters\Interfaces\
Find the interface that has your current IP address (see example below)
Add the following values and make sure they are set to 1.
TcpAckFrequency and TCPNoDelay
This is only a temporary fix for the reduction of some applications on the internet. Once your project or need is fulfilled, you should re-enable the algorithm by deleting the keys and rebooting or changing the values.
The CLI or Command Line Interface, is a text-based interface used to program devices such as switches and other network equipment. So it’s 2019. Why are we still using a CLI?
The reason? It allows a granular ability to program devices for hundreds of configurations. You see, a GUI is going to be limited (even though some have hundreds of options) and CLI uses less resources and truly can give you more control of the configuration.
Thus you can generally program a CLI faster than a GUI interface once you become skilled using the CLI. With a CLI, you aren’t waiting between commands and with a GUI interface, you are.
Below is a series of screenshots and several commands on the Dell N1548 switch (For more information on how technical it can be, see the 2410 page Dell PDF) . In this tutorial, we’ll show a novice how they can take a switch with no IP address and program the switch so that it can be accessed by a GUI interface with a static IP address.
While there are a million more options using a CLI, this is only an introduction to the CLI and does not imply this is the only way to program switches by any means. CLI commands can vary on manufacturers.
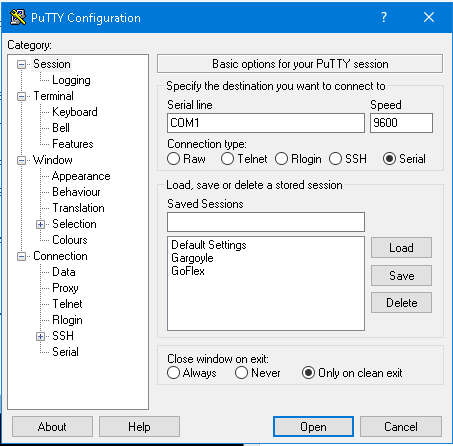
In order to use the CLI, you can use Putty or other software on your computer. You’ll also need the console cable that came with the device or a standard console cable.
With the switch off, connect the console cable to your computer and plug the opposite end into the console port of the switch.
Open Putty and select the serial connection or SSH (this will depend on your device). Generally a speed of 9600 will be ok if connecting via a serial cable.
Power the switch on and click Open on Putty. You should see the boot sequence for the device. If your screen is garbled, trying increasing the baud rate.
As the device loads, you will see information about the device scroll by on your console screen.
Once the device boots, you will (in this case) see console>
Next, type enable. This enables commands and the programming of the switch.
Once you hit enter, you will see console#
Next type configure in order to begin the configuration of the switch and hit Enter. You can normally type help or ? in order to get the command syntax as you enter different areas of the CLI.
Next type username {username you want} password {The password you want} and privilege 15
Note: The password and username used in this example are just that – examples. Privilege levels are determined by the switch or device manufacturer.
Next type ip default-gateway {Enter your gateway address}
Next type interface vlan 1
You will now see console {config-if-vlan1} – you can now type the IP address and subnet that you want by entering ip address {your ip address} {your subnet}
Next, type exit
To check your configuration, type show ip interface vlan 1
You should now be able to login to your switch using a browser by typing in the IP address in the address bar – This of course is after setting a static number on your NIC if your computer is not on your lan and has not received a DHCP number.
Log into the switch and you can hit the save button to make sure your configuration is saved.
Again, this is a tutorial for beginners. While you should disable protocols such as http, telnet and limit users on the switch, you have to remember there are hundreds of CLI commands and GUI configurations.
Always update your firmware and disable protocols that are not secure.
If you use more than one network card for mutliple LANS or connections, you can set the metric of each card to send IP packets through the fastest card first or the desired card.
For instance if you have a network card that connects to other servers and computers on one LAN and a network card that connects to a separate LAN that has security cameras; metrics can be used to compute the routing algorithm.
The one card would be set to a lower metric in order to go to the web and the security camera system would be set to a higher metric thus giving priority to the lower number.
Here’s an example of my home LAN which uses a printer and cameras on a separate network and my wireless which connects to the Internet.
So how do you change it? Open the Network and Sharing Center – Click on Adapters – Right click the desired adapter – Select Properties – Double click TCP/IP – Click Advanced – Uncheck the Automatic Metric – Change to the desired number
Wireless
Above the wireless is set to 1. Below the LAN which has a static IP address and no Gateway is configured with a 20.
Valid values are 1 to 9999.
Don’t forget to set the binding order of the network cards. Go to the Adapter. Hit the ‘Alt’ key once for the menu. Click on Advanced and then Advanced Settings.
Move the network card with a higher priority to the top.
icrosoft did recommend to disable short names in a security guide some times back. There is evidence that file operations in directories (folders) that contain a large number of file can be slowed by short file name creations. So does it improve performance? The short answer – Yes.
Now should you disable short names? This answer is going to be on a case by case basis. Some questions to ask yourself –
Do you have older programs that use 8dot3 (short names)?
Do you have a folder with a significant amount of files and coping or creating files is slow?
Below is a pic showing the improvement by disabling and stripping
Image: Blog Technet Microsoft
Here’s what you need to do –
Always backup your system
Open a Command Prompt as Administrator
Type fsutil 8dot3name query c:
(enter the drive letter at the end)
Type fsutil 8dot3name set c: 1
(This will disable 8.3)
If you want to do this system wide, type –
– fsutil behavior set disable8dot3 1
To strip existing files with a 8.3 short name, this will scan your computer and the system registry and strip the files of their short names type the following- – fsutil 8dot3name strip /s /v c:
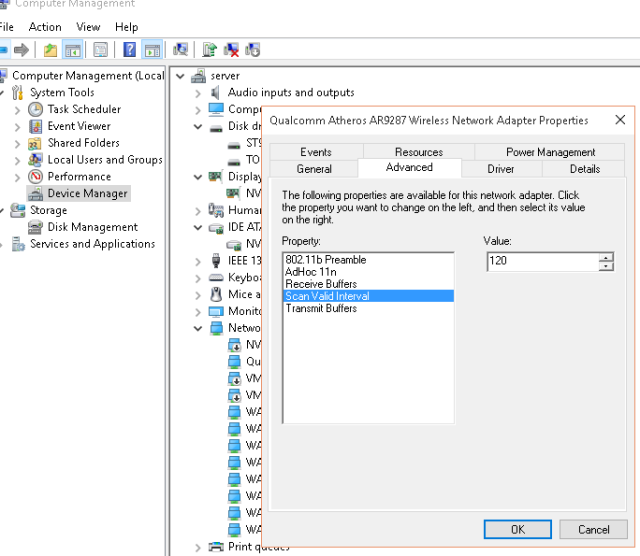
Is your Wireless dropping? Update your driver of course and then try changing your Scan Valid Interval. By default, most wireless cards are set to 60. This is the amount of time before your wireless ‘looks’ for other access points (for roaming). Try changing the interval to 120.
Open the device manager, double click on the wireless adapter, under advanced, click on Scan Valid Interval – change this to 120. If you have a card that has roaming under advanced, select the lowest option.
Note: If you have a laptop and are moving around in an area, you may need to lower this number.
Also, you may want to lower the Beacon Interval in your router if your signal is low or if you have drops. This sends beacons more frequently and can help with your signal. This may slightly decrease your bandwidth (wireless) and use a little extra battery on mobile devices.
While the default is 100, did you know if you increase this time (assuming you have a great signal in your home or business) that you can increase wireless bandwidth (slightly) and even increase your battery life of devices?
Also, do a quick survey of your entire home. As you can see, one side of our house has interference on channel 11. Because the ‘user’ of the other wireless is using Channel 6 + 10 (40 mhz ) spread, Channel 6 and 11 are NOT optimal. Therefore, channel 1 is the optimal channel (you can see two devices – my AP and printer)
Left – host computer Right – TightVNC into another computer in my home.
Remember, router position and direction matters. As you can see below, repositioning the router got rid of “Saw Tooth” (signal that goes up and down).
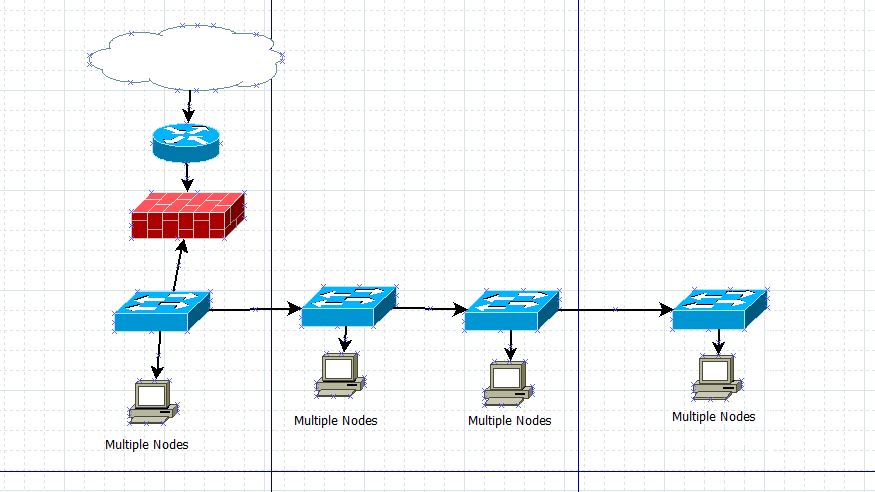
When you are networking computers, wireless access points, printers and other nodes in multiple rooms, try to avoid daisy-chaining switches or using small 4-8 port switches when you are in a hurry. Replace any hubs on your network as soon as you can.
With a hub, collisions can be >20% and utilization can stand at >50%. By replacing a hub alone, you can reduce collisions to 5% on switches in rooms and <1% in the server room. Switches help to isolate traffic, relieve congestion, separate collision domains (reduce collisions), segment and restart distance/repeater rules.
Daisy Chaining Switches -what not to do
Real world scenarios may require you to temporarily daisy chain switches. If you do, test the network and run additional backbones or replace core switches to accommodate more nodes as soon as you can. (remember, replace any hubs in your network)
One of many solutions is to run independent lines to the core switch
This is the very basics behind network switch infrastructure. Managing switches and using the IEEE standards above along with optimizing your network and managing the network infrastructure is important.
All over the internet you will find information on ‘How to Subnet’. Suddenly you are thrown into a world of bits and binary and given charts of ‘How to Subnet’. But why do you subnet?
Subnets are created to separate areas of your network for security and/or to hold down broadcasts. Computers constantly ‘talk’ to each other. If you have a network of 10 computers, the talking (opening files or programs) or broadcasting packets that are sent out during networking is not much traffic at all. However if you have 10,000 computers talking and passing data, you will have thousands of computers passing data and your network will slow down from all of the information. If you still don’t understand, invite 10 friends over for a get together. It’ll get noisy but you can still hear every conversation. Now, go to a rock concert with 10,000 screaming fans. Get the picture.
Subnetting allows you to divide areas of your network out to prevent this. So here comes the golden question. How can you get them to ‘talk’ when you need to? With the installation of a Layer 3 Switch or a router, these subnets can talk.
And for all of the folks who know a ton of details on the subject, this is just an example for people who are searching why to subnet.
Other Ways to Divide Your Network
Are there other ways to divide your network? You can use VLANs. Devices such as switches allow virtual lans to be set up. By purchasing managed switches, you can separate different areas of your network thus separating areas for security and holding down traffic.
So now I know why – but how and don’t give me binary and all the fuzzy stuff!
The best explaination I have found is at this link. A simple chart with examples!
Here’s my example –
Subnetting allows your network to become more efficient and allows you to separate your network by subnets.
Let’s say your network is on a 192.168.1.x numbering scheme.
How do you know what your network is? Open a command prompt and type ipconfig. See the gateway? That is your starting number for your network. The network allows 254 computers to be in the broadcast domain.
So if you do an ipconfig and see this-
192.168.1.125 – your ip address
255.255.255.0 – your current subnet
192.168.1.1 – your gateway (This is your router or firewall – the point leading to the internet)
Now let’s say you have 20 devices in your network. How can you effectively hold down broadcast and prevent your router from building tables for each device? How can you make it more effective and hold down traffic? Actually without understanding binary, you can do this. Remember this is basics and should help you understand.
You see under the current network, you can have 254 devices in your network. Printers, routers, computers, tablets, netbooks, notebooks, etc. The last set of numbers called an octet only goes from 1-254. But lets narrow this down.
You can use a CIDR calculator online to determine how to tweak your network. A good site is Subnet Calculator. Go there and enter your router’s number in the ip field. Now go down and enter a number close to the number of devices you have on your network. In this example, enter 30.
Did you see where the subnet changed to 255.255.255.224? (Did you notice that 224 + 30 is 254?)
Ok, now open your adapter settings by clicking the network icon at the bottom right corner and selecting Open Network and Sharing Center.
Now click on the adapter settings.
Right click and select properties on your adapter that is active.
Now select Internet Protocol v4
Enter an ip address statically (manually put it in). Put in your new subnet and your gateway. You must also put in your DNS or a public DNS server. You should keep a list of each devices number to avoid any problems. All ip addresses must be different on each device.
The only valid numbers in this broadcast domain now is – 192.168.1.1, 192.168.1.2, 192.168.1.3 continuing until you get to 192.168.1.30 (remember you chose to have up to 30 devices on your network.) If you enter any number above this, you will get an error.
Error screen showing an ip address above what you selected.
If you get the above error screen, you have entered an invalid number.
After you select a number between 192.168.1.1 and 192.168.1.30, click OK and exit all screens by clicking OK.
If you do an ipconfig now, you will see this-
When you change subnets as the above example shows, you have to remember that you may lose connectivity to devices such as routers or network printers. You will need to set devices such as servers and these devices on the same subnet so that whoever is assigned this subnet can communicate with them.
This by no means is a thorough subnetting lesson. It can become much more complex by introducing multiple routers into your network, DHCP servers or other devices. This is a simple how-to that shows you how broadcast domains can be more efficient.
Now one more thing. Want to know how to subnet? You can use the magic number method.
Need to speed your internet up or tweak your network out? Here’s some things to take into consideration. Something called Silly Window Syndrome can occur if a server or workstation that has a shared files has high latency.
You see, when there is no synchronization between the workstation and a server (or ws to ws) regarding the capacity of the flow of data being sent or the packet size, Silly Window Syndrome can occur.
Here’s where Nagle’s algorithm is used if the Silly Window Syndrome occurs from the sender. You can make sure it is enabled by running the script below from a command line (as administrator). Nagle will send the first segment even if it is tiny. Then it’ll wait for the acknowledgement (known as an ACK) is received or a MSS is accumulated. (MSS – maximum sized segment)
You see, Nagle’s algorithm works by improving TCP efficiency. This algorithm reduces the number of small packets being sent over a network.
So what if the delays are caused by the receiver? David D Clark’s solution can be and is used. Clark’s solution closes the window until another segment of MSS can be received or if the buffer becomes half empty.
Now there something else – Delayed ACK tries to send more data over a segment if it can. Here’s the problem. the interaction of Delayed ACK with Nagle’s algorithm can create 200+ ms delays.
How do I?
Run this from a command line as an administrator to turn off Nagle’s algorithm
There’s several other things you can do for latency –
Check things like LLMNR. You can get delays with SQL and you may need to disable it on work stations and the server.
Look at Nagle’s Algorithm and Delayed ACK.
You can turn Nagle’s algorithm on or off as needed. It’s not always the best choice in highly interactive networks but can help to speed up downloads and remote connectivity. We’ve had several students in a jam that needed a file moved and high latency stopped them or the download failed. So what did they do? Adjusted Nagle’s Algorithm.
Disable everything in the network card settings with the exception of flow control
Manually adjust the connection speed – we’ve seen even with the correct network card drivers slow throughput on networks. After adjusting to 1Gbps manually instead of auto, the computer speed up.
Is everything a gigabit? Switches, servers, workstation and other. If so, enable jumbo frames.
Remember always optimize your network before you throw hardware at the problem.
Also, don’t worry, Karn’s algorithm will be working when computers are talking. It basically measures time from point A and B and if there is a delay, it’ll say ‘hello’ again to try and get a response.
If you have an application you need to access that uses TCP across the network, you may be able to speed it up by enabling TcpAckFrequency and/or TcpNoDelay in the registry. –
Make sure you find the correct interface for your active network connection.One way is to look at the IP Addresses listed until you find the correct interface.
On the right window, create a DWORD32 for-
TcpAckFrequency=1
TCPNoDelay=1
Reboot
Always make sure you measure your network speed before you make changes to set a baseline. Measure the speed after you make changes. How do you measure it? Put the following software on the workstation and server. Totusoft’s Lanspeed
Having connection issues and no viruses or malware? Hardware ok?
Try typing the following at a command prompt as an administrator
(you can copy and paste the bold text below) to fully reset the TCP/IP Stack-
netsh winsock reset catalog netsh interface ipv4 reset netsh interface ipv6 reset arp d netsh winsock reset netsh int tcp reset netsh int ip reset netsh int ip delete neighbors netsh int ip delete destinationcache netsh int ip delete arpcache ipconfig /flushDNS ipconfig /registerDNS ipconfig /displayDNS NBTStat -R NBTStat -RR
Because you may have ports opened or your firewall has exceptions, the next command resets your firewall – This is optional
Need to optimize your network? Look at adjusting LocalPriority, HostPriority, DNSPriority or NetBTPriority. (Host/DNS resolution)
The tweak works by increasing the priority of four processes.
HKEY_LOCAL_MACHINE\SYSTEM\CurrentControlSet\Services\Tcpip\ServiceProvider\
LocalPriority = 4 (DWORD, the default is 499, change to 4)
HostPriority = 5 (DWORD, the default is 500, change to 5)
DnsPriority = 6 (DWORD, the default is 2000, change to 6)
NetbtPriority = 7 (DWORD, the default is 2001, change to 7)
You can use this script at a command prompt (as Admin) or in PowerShell (as Admin)-
New IT professionals may think that adding a second network card will improve throughput. While this can be true, IT personnel need to be aware of several rules behind configuring multiple network cards.
Assuming the server will be in the same subnet, once the network cards are installed, several decisions have to be made. Will the cards be independent and have separate IP addresses or will the cards be bridged and have the same IP address?
Two IP addresses
If you plan on installing two nic cards in your server and you want to use two ip addresses-
Make sure that licensing of software is not based on the MAC address of one of the NIC cards
Do NOT enable NetBIOS over TCP/IP – This can cause the name of the server to appear on the network more than once and an error will occur (multiple NetBT Event ID 4319 Errors stating “A duplicate name has been detected on the TCP network)
Use an internal DNS server – Client computers will use a DNS round-robin and routing tables will be built
One IP Address, multiple NIC cards
If you plan on using aggregation or the bridging of your network cards-
USE HP, Intel, Broadcom or other NICs that support teaming (drivers) – this is important so that the cards will be used together
Note- (Our recommendations)
Connect each NIC to a separate switch to ensure switchport flooding does not occur.” Use switches that support IEEE 802.3ad
USE RSS and modify the registry appropriately to use multiple CPUs In Windows Server 2008, administrators can set the maximum number of RSS CPUs with the MaxNumRssCpus registry keyword in HKEY_LOCAL_MACHINE\\SYSTEM\CurrentControlSet\Services\Ndis\Parameters. TheMaxNumRssCpus value is a DWORD type and, if it is not present, NDIS uses the default value of 4.
More information: http://msdn.microsoft.com/en-us/library/windows/hardware/ff570795(v=vs.85).aspx
Do you travel? Want extra protection of taking a router with a firewall with you when you are on the road? Want the flexibility of OpenWRT?
The GL iNet GL-MT300N-V2 mini smart router is loaded with a ton of features. These Routers can act as a router, repeater, WDS, 3/4g Modem or it’ll work with phone tethering.
For less than $21, this tiny router packs a lot of punch. Able to fit in the palm of your hand, the router has the following features.
Using the default login, the GL-MT300N-V2 can be accessed by a web browser.
The admin panel contains every feature you’ll need in any router. While this custom menu has Internet, Wireless, Client info, Upgrade (firmware), Firewall, VPN (OpenVPN), Applications and more settings; its OpenWRT that makes this router unique.
Because the router runs on OpenWRT firmware, items such as a firewall, OpenVPN and more are available.
The firewall features logging and a Captive Portal.
The Network Mode includes changing the router from being a router to a wireless access point, Extender or WDS (Wireless Distribution System).
By entering the IP address with /cgi-bin/luci, you can gain access to OpenWRT. What is LuCi?
The full OpenWRT menu is available including graphs and all of the features of OpenWRT.
Real-time information can be accessed under the OpenWRT menu.
On our server, we use a SSD with the Inetinfop\Parameters set to 2. You need to run the performance under plugins at 100,000 request. So go to site administration and see how you do.
The equivalent to KeepAliveTimeout is ListenBackLog (IIS – registry location is HKLM\ SYSTEM\ CurrentControlSet\ Services\ Inetinfo\ Parameters). Set this to between 2 to 5.
Change the MemCacheSize value to adjust the amount of memory (Mb) that IIS will use for its file cache (50% of available memory by default).
Change the MaxCachedFileSize to adjust the maximum size of a file cached in the file cache in bytes. Default is 262,144 (256K).
Create a new DWORD called ObjectCacheTTL to change the length of time (in milliseconds) that objects in the cache are held in memory. Default is 30,000 milliseconds (30 seconds).
While I’d like to guess that over 98% of the computers that I have worked on that are privately owned; the drivers were out of date or missing critical drivers that other drivers rely on.
Here’s what I mean. If you decide to update your wireless drivers, don’t go to the manufacturer of the computer, look for drivers from the hardware website. Don’t download any program that offers to update your drivers. Update your drivers manually. Open the device manager, look for the device you want to update, navigate to the hardware manufacturer’s website, download the zip file, unzip the file, click update driver, select let me choose and point to the location of the driver.
Now which drivers should you update? Video, sound, network (wired and wireless), camera, mouse (synaptics if a laptop), and most importantly, the chipset. Why the chipset? It controls the peripheral equipment (e.g. video, sound, network). Updates usually correct problems or latency issues.
Remember, the chipset and BIOS (UEFI) control these devices. It’s important to get BIOS/UEFI updates along with what controls your computer…the chipset.
There is truly an advantage to adding multiple NIC cards to a computer. It won’t speed up a single internet connection but it can help with loss of signal, detecting access points, transferring information to and from computers.
When adding a second NIC card to a computer, you can highlight both by holding down the CTRL key and clicking on them and then right clicking to bridge the connections so they act as one…this can allow you to bridge a wireless network to a wired network.
Two nic cards on the same network can allow for load balancing.