
The CLI or Command Line Interface, is a text-based interface used to program devices such as switches and other network equipment. So it’s 2019. Why are we still using a CLI?
The reason? It allows a granular ability to program devices for hundreds of configurations. You see, a GUI is going to be limited (even though some have hundreds of options) and CLI uses less resources and truly can give you more control of the configuration.
Thus you can generally program a CLI faster than a GUI interface once you become skilled using the CLI. With a CLI, you aren’t waiting between commands and with a GUI interface, you are.
Below is a series of screenshots and several commands on the Dell N1548 switch (For more information on how technical it can be, see the 2410 page Dell PDF) . In this tutorial, we’ll show a novice how they can take a switch with no IP address and program the switch so that it can be accessed by a GUI interface with a static IP address.
While there are a million more options using a CLI, this is only an introduction to the CLI and does not imply this is the only way to program switches by any means. CLI commands can vary on manufacturers.
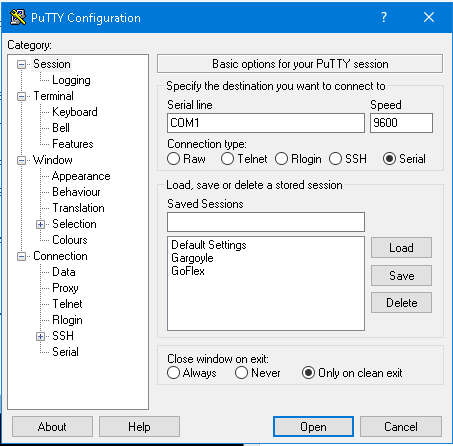
In order to use the CLI, you can use Putty or other software on your computer. You’ll also need the console cable that came with the device or a standard console cable.
With the switch off, connect the console cable to your computer and plug the opposite end into the console port of the switch.
Open Putty and select the serial connection or SSH (this will depend on your device). Generally a speed of 9600 will be ok if connecting via a serial cable.
Power the switch on and click Open on Putty. You should see the boot sequence for the device. If your screen is garbled, trying increasing the baud rate.

As the device loads, you will see information about the device scroll by on your console screen.


Once the device boots, you will (in this case) see console>

Next, type enable. This enables commands and the programming of the switch.

Once you hit enter, you will see console#

Next type configure in order to begin the configuration of the switch and hit Enter. You can normally type help or ? in order to get the command syntax as you enter different areas of the CLI.


Next type username {username you want} password {The password you want} and privilege 15
Note: The password and username used in this example are just that – examples. Privilege levels are determined by the switch or device manufacturer.

Next type ip default-gateway {Enter your gateway address}

Next type interface vlan 1

You will now see console {config-if-vlan1} – you can now type the IP address and subnet that you want by entering ip address {your ip address} {your subnet}

Next, type exit

To check your configuration, type show ip interface vlan 1
You should now be able to login to your switch using a browser by typing in the IP address in the address bar – This of course is after setting a static number on your NIC if your computer is not on your lan and has not received a DHCP number.

Log into the switch and you can hit the save button to make sure your configuration is saved.

Again, this is a tutorial for beginners. While you should disable protocols such as http, telnet and limit users on the switch, you have to remember there are hundreds of CLI commands and GUI configurations.
Always update your firmware and disable protocols that are not secure.


